Create Network Action
This article provides step-by-step guidelines for developers to create a Network Action. With the Network Action system, developers can easily integrate their services into the Capture ecosystem, providing a new way for users to access and interact with their service.
Before Starting
The Network Action system consists of three main components:
- Action DB, which stores entries and action arguments that are accessed by the Capture Cam;
- Action Backend, which handles the creation of orders, charging of users, and calling of webhooks to complete actions;
- Action Webhook, which allows third-party services to be integrated into the Capture ecosystem by forwarding calls to the service's webhook for processing.
In the Network Action system, the term "Network Action" refers to the overall system, while a "network app" refers to a specific application that has been registered in the Action Backend.
Defining Your Network Action
Price
To define the price of your Network Action, you need to consider the value that it provides to users and the cost of providing the service. You can also refer to the prices of other actions in the market to get an idea of the price range.
Once you have decided on the price, you can specify it when you register your network app to the Action Backend. Payments of Network Actions are charged by Orders with NUM, and users can either pay with NUM coins or Capture Credits (1 Capture Credit = 1 NUM coin).
The Action Backend will charge 12% revenue sharing for every completed Order.
Name
It is important to choose a clear and concise title for your Network Action as it will be displayed to users as the title of your Network Action in the Capture Cam. A well-written title can help users understand the purpose of the action and increase the chances of them using it. Make sure to carefully consider the title you choose, as it will be an integral part of the user experience for your network action.
Webhook URL
Webhooks are a crucial part of the network action system. A webhook is a URL that the Numbers backend can call to trigger a specific action in your service after the Order completes. When a user initiates a Network Action in the Capture Cam, the Numbers backend sends a request to the specified webhook URL with the necessary information to complete the action.
It is important that the webhook is set up and functioning properly in order for the Network Action to be successful. It is also a good idea to include error handling in the webhook to ensure that the action can still be completed even if something goes wrong.
Preparing Your Webhooks
When an Order is completed for the registered network app is completed, a POST request will be sent to the webhook_url. Here is an example payload:
{
        "site": "https://api.numbersprotocol.io",
        "event": "onOrderCompleted",
        "network_app_id": "df613453-b1b8-451d-b303-9891926545ad",
        "network_app_name": "TestApp1",
        "order_id": "2c2f2fea-5816-4224-9029-8241f65b97eb",
        "order_status": "completed",
        "order_price": "0.100000000000000000",
        "order_fee": "1.487857728822768889",
        "order_quantity": 1,
        "order_user_email": "[email protected]",
        "order_fund_tx_hash": "0x1d1e5eb2aa8e4436798491ae4defbf78b8c78c0dbaa7475b78d586dbd865ae13",
        "order_payment_tx_hash": "0x69f2ebd3650d0ea1619f09560ec4c1df25993066f028da9406f49f4b50537687",
        "action": "",
        "action_args": {}
}
Please ensure that your Webhook is able to handle the POST request with the above payload.
The Action Backend will send the Basic parameters, Optional parameters, and Action arguments to the Action Webhook upon completion of an Order. It is important to ensure that your Action Webhook is correctly configured to accept all of the Basic parameters to avoid potential request failures. The network_app_id is the ID you obtain after registering to the Action Backend, and the order_id can be used to verify the authenticity of the request. The order_price, order_fee, order_fund_tx_hash fields indicate the payment details of the Order.
Basic Parameters
{
        "cid": str(asset.id), #Cid/Nid of the asset
        "token": str, #user access token
        "order_id": str(order.id),
        "order_status": order.status,
        "network_app_id": str(network_app.id),
        "network_app_name": network_app.name,
        "order_fund_tx_hash": order.fund_tx_hash,
        "order_payment_tx_hash": order.payment_tx_hash,
        "order_price": str(order.price.normalize()),
        "order_fee": str(order.fee.normalize()),
        "order_user_integrity_wallet_address": str, #Integrity wallet of the user
}
Optional Parameters
{
        "order_num_charged": str(order.num_charged.normalize()),
        "order_num_paid": str(order.num_paid.normalize()),
        "order_points_charged": str(order.points_charged.normalize())
        "order_points_paid": str(order.points_paid.normalize()),
        "order_quantity": order.quantity,
        "order_user_email": order.owner.email
}
Action Arguments
Action Arguments are additional parameters defined by your Network Action. You can find a list of all available parameters in this table. If none of these parameters suits your needs, you can request new ones.
It's essential to ensure that the name of the parameter matches the parameter of your Action Webhook input.
Webhook Examples
You may use any language for your Webhook; even low-code frameworks such as Pipedream or Bubble. Here are examples in Python and Javascript. These are just basic examples and you will likely need to add additional error handling and logic to your Webhook to fully process the payload and perform any necessary actions.
Python
import json
from flask import Flask, request

app = Flask(__name__)

@app.route('/webhook', methods=['POST'])
def handle_webhook():
  data = request.get_json()

  # Print the received data
  print(json.dumps(data, indent=2))

  # Extract values from the payload
  site = data['site']
  event = data['event']
  network_app_id = data['network_app_id']
  network_app_name = data['network_app_name']
  order_id = data['order_id']
  order_status = data['order_status']
  order_price = data['order_price']
  order_fee = data['order_fee']
  order_quantity = data['order_quantity']
  order_user_email = data['order_user_email']
  order_fund_tx_hash = data['order_fund_tx_hash']
  order_payment_tx_hash = data['order_payment_tx_hash']
  action = data['action']
  action_args = data['action_args']

  # Do something with the extracted values
  # ...

  return 'Success'

if __name__ == '__main__':
  app.run()
Javascript
This code creates an HTTP server that listens for incoming POST requests from the Action Server and logs the body of the request to the console.
const express = require('express');
const bodyParser = require('body-parser');

const app = express();
app.use(bodyParser.json());

app.post('/webhook', (req, res) => {
  const { site, event, network_app_id, network_app_name, order_id, order_status, order_price, order_fee, order_quantity, order_user_email, order_fund_tx_hash, order_payment_tx_hash, action, action_args } = req.body;

  console.log(`Received request for site: ${site}`);
  console.log(`Received request for event: ${event}`);
  console.log(`Received request for network_app_id: ${network_app_id}`);
  console.log(`Received request for network_app_name: ${network_app_name}`);
  console.log(`Received request for order_id: ${order_id}`);
  console.log(`Received request for order_status: ${order_status}`);
  console.log(`Received request for order_price: ${order_price}`);
  console.log(`Received request for order_fee: ${order_fee}`);
  console.log(`Received request for order_quantity: ${order_quantity}`);
  console.log(`Received request for order_user_email: ${order_user_email}`);
  console.log(`Received request for order_fund_tx_hash: ${order_fund_tx_hash}`);
  console.log(`Received request for order_payment_tx_hash: ${order_payment_tx_hash}`);
  console.log(`Received request for action: ${action}`);
  console.log(`Received request for action_args: ${JSON.stringify(action_args)}`);

  res.sendStatus(200);
});

app.listen(3000, () => {
  console.log('Webhook listening on port 3000');
});
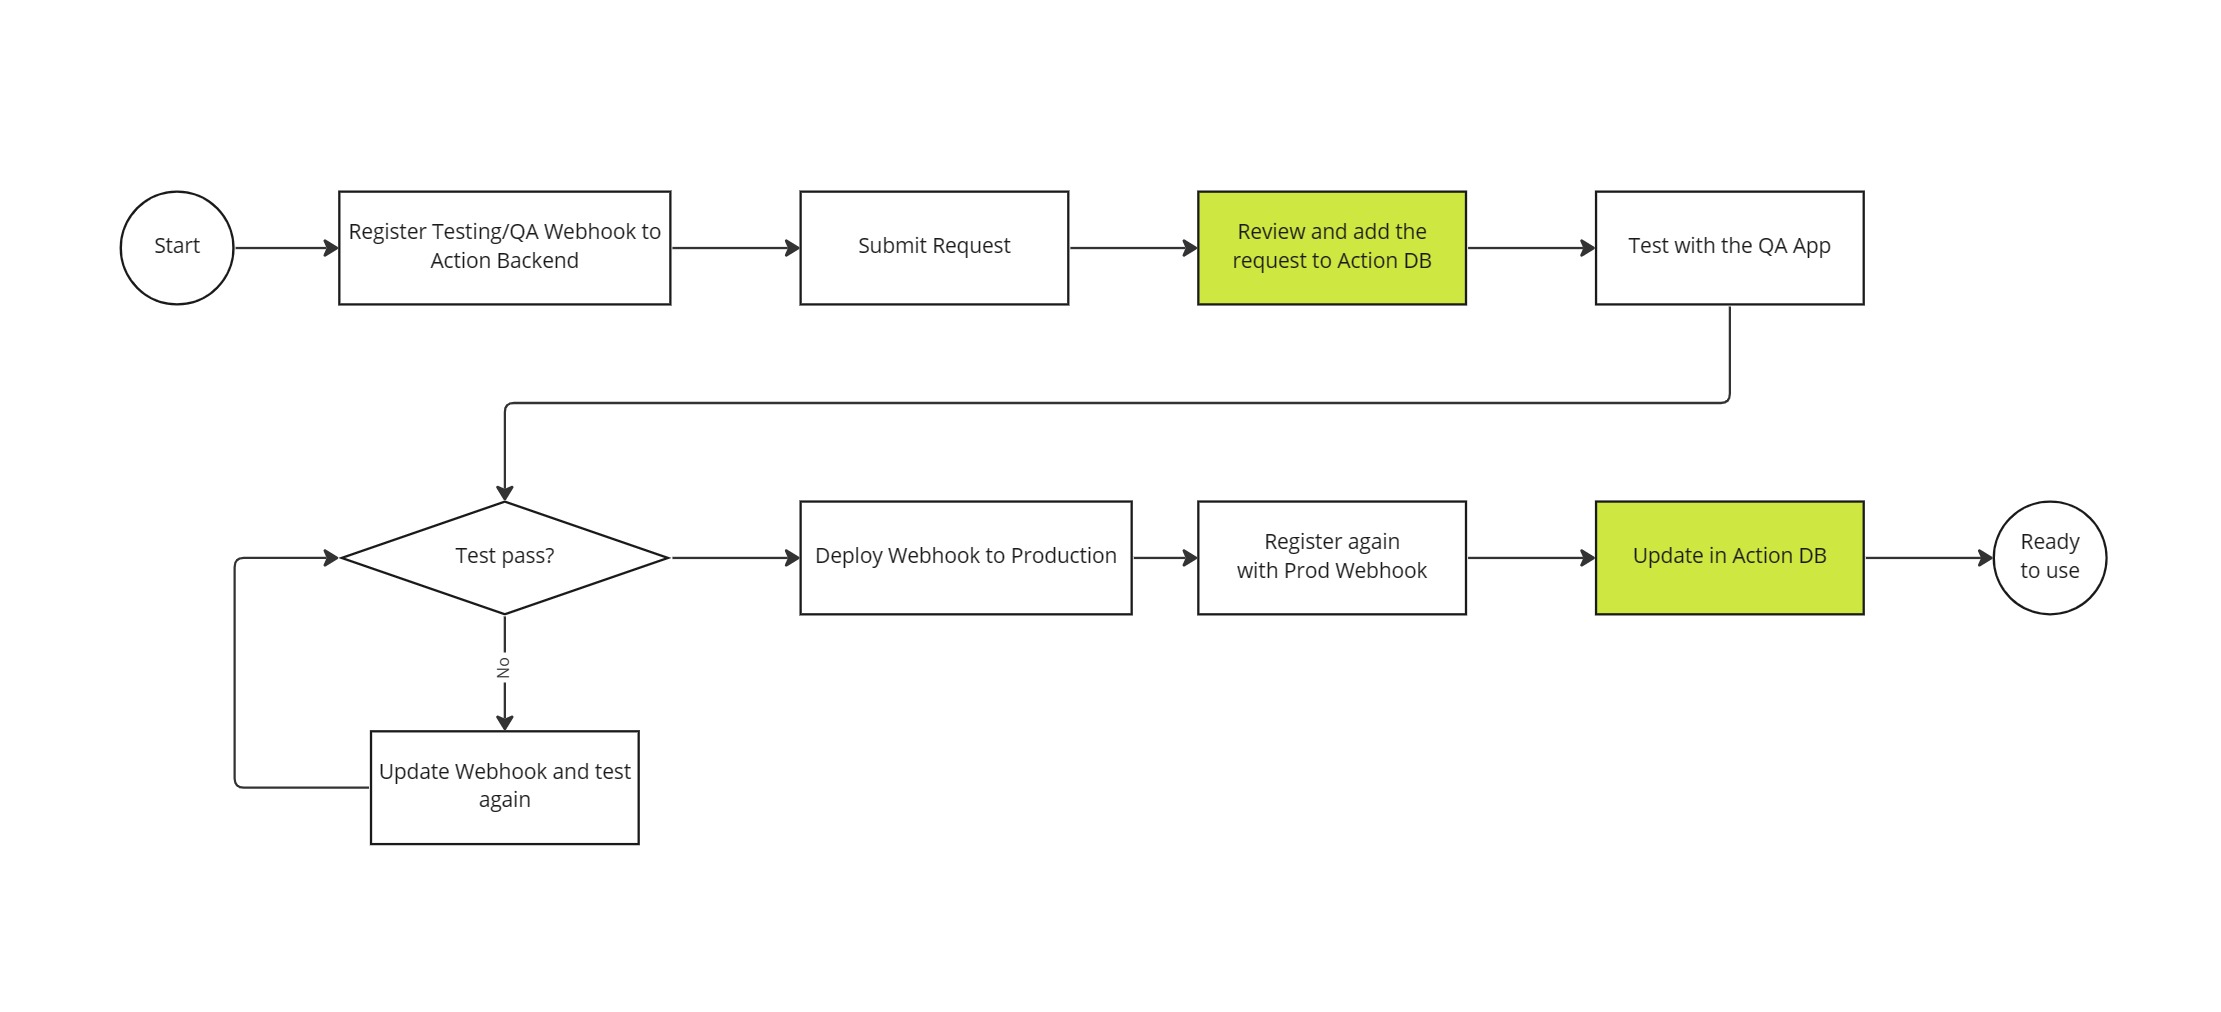
High-level process of the development of Network Actions
Once the basic properties such as property, banner, title as well as the Webhook of your Network Action are ready, you are ready to develop a Network Action. The following are basic steps to develop a Network Action:
- Define the Action spec and register your network app to the Action Backend using this API to obtain the Action Backend ID (the returned Network App ID). Please note, if you want to test the network action in the QA or testing site of your service, you should register the network app with the Webhook connecting to the QA or testing site of your service in this step.
- Prepare banner and Webhook URL following the spec below
- Submit the Network Action application form, choose
QAas the Action Phase and wait for approval. Same as step 1, if you need to test your Webhook before deploying it to production, submit with the Webhook connecting to the QA or testing site. All pending applications can be found here. - [Optional] Request any new parameters that you may need.
- After the Network Action has been approved, you can test it using a special QA version of the Capture Cam. In this version of the Capture Cam, you should be able to see your Network Action and perform full tests before it is deployed to production.
- Test and ensure that everything is working as expected. If you need Capture Credits to perform actions, use this form to submit the request.
- Once you have completed all necessary testing of your network action, deploy your Webhook to the production site and repeat step 1 and step 3. Register the network app to the Action Backend with the deployed Webhook and choose
Liveas the Action phase. - After your request from step 7 has been approved, you should be able to test your Network Action with the Capture Cam downloaded from the App Store and Google Play.
 (230815 update brand name).jpg)
Testing phases of the Network Action
Action Database (Action DB) 
The Action DB is a crucial component of the Network Action system, as it stores the entries and action arguments that the Capture Cam fetches and displays to users. The database diagram of it can be found here. It consists of three main tables:
- Actions: This table stores the main data for network actions. The Capture Cam will display data from this table directly in the Live DB, so it is important to ensure that the data is reviewed to the highest standard.
- Params: This table stores arguments used by actions. The Capture Cam will display the chosen parameters defined by the Action based on the properties defined in this table. The params created by users will be forwarded to Action Backend as the
action_args,then forwarded to the Action Webhook. If none of the available parameters fit your needs, you can request new ones. - Orders: This table is a backup of Action Backend orders. After the backend completes an order, it is required to write an order to complete the action using a webhook. This table can be accessed by external partners. Refer to the "Query Network Action orders" section for more details.